This Northern California road trip has been a dream of mine since I was a little girl. I would fantasize about renting a red convertible (think Barbie-style) with the top down and cruising along Highway 1, wind blowing my hair and constant views of the Pacific Ocean while swerving around spiralling mountain roads. Well, other than the convertible, this little dream of mine came true. And I have to say, I’m happy we opted out of the convertible part. This took some planning a couple of months in advance, though it really didn’t need to, but I wanted to make sure I got us to the most perfect spots during our journey.
Ever since I met my boyfriend, he dreamed of hiking Half Dome in Yosemite National Park. For our 2017 trip, we knew we wanted to find something within North America and decided on a 2 week road-tripping journey to make it happen. During this process, Half Dome became one of my own dreams too.
Yosemite is one of the best and most popular National Park’s in the entire world so we knew that getting a good camping spot wouldn’t be easy. If you look at a map of Yosemite’s campgrounds, there are quite a few, but if you’re a foreigner, you don’t realize how far most of them are from the actual main attraction – Yosemite Valley. You could be driving over 2 hours each way from your camp site to the valley everyday if you end up in one of these campgrounds. So here’s the thing – if you think you may want to go in the summer, and of course get one of the few campground sites inside the valley, you need to book a site early March at the very second the reservation system opens online. I’ve NEVER seen sites book up so fast. In a major city, the hottest concerts in town sell out in a minute, and this booked up even faster than that. In seconds I tell ya! You’re competing with people from all over the world who plan on travelling from near and far to get a taste of the most well-known national park.
The minute it opened, even though we were both at work, my boyfriend and I each had about 10 internet browsers open and pre-loaded with different campsites in one of the Valley campgrounds – the goal being to just click ‘submit’ the second the site allowed us to. We weren’t picky here in terms of which site or which campground, so long as it was in the valley. If you plan on hiking Half Dome, I strongly recommend you try and camp out in the valley the night before or else you’re driving super early in the morning to get to the base for sunrise. Needless to say, our over-preparedness worked, and we got 4 consecutive nights at the same site in the Lower Pines campground within the valley. Now that we had sites booked, we knew our trip had to happen and the rest of the planning began.
To get the permits to hike Half Dome and complete the cables we had to apply to a National Parks Service lottery application in March, after the campsite bookings were completed. This is one of the top day hikes in the world, so actually obtaining a ticket to this is stiff competition but we had “Lottery opening date” marked in our calendars so we could be ready the second it opened, as we did with our camp sites. Unfortunately this time, we didn’t receive one of the lucky tickets but our hopes weren’t dashed. There is a more “last minute” lottery application once the hiking season kicks in where you apply 2 days before the date you are looking to hike, but this is not guaranteed.
When we landed in San Francisco (our starting point), we applied to the last-minute Half Dome applications right away, knowing we would be picking up the van the following day and driving to Yosemite from there. Later that first night, we found out we got 2 applications to hike the Half Dome cables for our first full day in Yosemite and we were ecstatic to think that we would finally be achieving our dream.
Now before I get to the hike, and Yosemite, I’ll back track a bit to the few days before. Once we landed in San Francisco, we took the BART (city-wide rail system) to downtown and booked a cheap hotel near Union Square as it was the main center of the city and very accessible. Even the crappiest of hotels was pricey but travelling for 2 weeks in an expensive city meant that we needed to be on a budget. Needless to say, we opted for a less-than-ideal hotel experience at the Winsor Hotel on 6th Street – all the non-chain hotels in San Fran are not that great so keep your expectations low, but really it was the location that made it truly awful. 6th Street is not an ideal place to be – right outside of the hotel was a hangout for the sort of folks you don’t really want to encounter. The good news is that we were only staying a short time until we were able to get our rented van so we knew we were getting out of there in no time.
Our trip plan/road trip route was as follows:
- San Francisco: 2 nights
- Yosemite National Park: 4 nights
- Sequoia National Park: 1 night
- Monterey/Big Sur: 1 night
- Santa Cruz: 1 night
- San Francisco: 3 nights
- Berkeley: 1 night
- Pacifica: 1 night
SAN FRANCISCO – PART 1

We had a good full day in the city before our camping extravaganza began so we spent it wandering around Valencia Street which had a bunch of unique and interesting shops and cafes, as well as checking out the painted ladies. At night, we had dinner at Fisherman’s Wharf which is sort-of a must do for visitors – it was a bit kitschy and very geared to tourists but the restaurants were good and had fresh seafood which we knew we weren’t going to have while camping.
The next day, our road trip began. We rented a camper van from Lost Campers and had an excellent experience with them – very highly recommended if you’re looking to do the same sort of trip. We would’ve needed to rent a car anyways, and after researching prices, the camper van came out to approximately what a regular rental car would’ve been – but without the hassle of bringing around a tent and camping/cooking equipment (it’s all included). Plus, whenever we pulled into a site, there was minimal setup – you literally just move up the driver and passenger seats and unfold the very comfortable bed in the back. Lost Campers was great because their vans look like regular family caravans – there is no wording or advertising at the side of the cars so we didn’t look like the Griswold’s from the National Lampoon Vacation movies.
Driving to Yosemite from San Francisco was nothing too special but once we got near the park, and the roads were winding around the mountains, the scenery was breathtaking as we climbed in elevation. We got to our campsite just as it was getting dark and had an incredible view of Half Dome right in front of us – which we would be finally climbing the following day.
YOSEMITE & HALF DOME

Half Dome day was something I will never forget. We made sure to wake up right when the sun was rising so we could begin the hike as early as possible. We originally planned on starting even earlier but when we woke up with complete darkness, we figured it would be too hard to get ourselves organized in the pitch black so waited it out a bit. We had our normal hiking-day breakfast of oatmeal and coffee and walked over to the start of the Mist Trail, which would take us up to the base of sub-dome for the cable climb. If you are hiking to Half Dome, it’s recommended that you bring about 4 litres of water with you as there is nowhere with potable water to fill up along the way. We each brought our 3 litre water bags (Camelbacks) in our backpacks and a large Nalgene bottle filled to the top. It made our day bags pretty heavy but it was definitely necessary.
We started hiking at 7am with just a couple of people in sight. The Mist Trail takes you up to the Vernal and Nevada Falls so it gets busier a little later in the day with groups of families taking up the narrow trail space there is. The trail is pretty steep as you climb uphill but it doesn’t take too long. The waterfalls are really incredible to see – it does make the path very slippery so you really need to focus where you’re stepping but wow what a sight. As a Canadian who has seen Niagara Falls a zillion times, these waterfalls in Yosemite were something else. You’re super close to them (literally feeling their spray as you walk beside them) and can see and hear how powerful they are. They flow down into the Merced River which runs through the park and acts as the main water source for the wildlife in Yosemite.
Once we got past the waterfalls, the scenery changes quite a bit as you walk through more of a flat backcountry camping zone with tons of tall trees surrounding you. At this point, you’re able to see the mountains a bit as you start to make your way towards their bases. It’s quite serene and super quiet which was beautiful. We had a deer walking beside us for a bit of this path as they don’t seem to fear humans – we got some good pictures but we knew to keep our distance.
The next section is similar to Canadian trails with more of a wooded area and a path winding through the trees as you climb slowly uphill. This took us to the top of a smaller mountain that leads up to sub-dome, giving you a great view of what’s to come. We decided to have lunch here as we looked up at Half Dome, as well as down in to the valley below and realized we were at a high elevation at this point. Once we re-energized with PB&J and trail mix, we started the ascent to the final destination of Half Dome, but first, we had the arduous climb of Sub-Dome.
In all of the research I did, nobody mentioned how hard sub-dome would be. Not that it was long, but it was physically demanding. Like Half Dome, it’s a straight and heavily angled granite rock – but on sub-dome, there are limited grooves to actually plant your feet in to. You need to scramble on your hands and feet to make your way, very slowly and carefully, to the top. Because of the angle of it, you feel as if you’re about to just slip off and fall at any instant into the valley far, far below you. Just do not look down. In any case, with our hearts racing from fear of slipping below, we made it to the top of sub-dome, which really is just the base of Half Dome. From here, you’ll be able to see hikers waiting patiently near the cables for their ascent.
At the cables, the Yosemite Park Ranger who was checking permits told us that the group there was waiting because there were storm clouds overhead and he advised them to wait it out and hope it would clear. Half Dome should not be climbed in inclement weather – even if it’s just a tiny drizzle. It’s a solid granite rock that you basically need to climb vertically, and if it gets wet, you are intensely slipping off of the side to your doom.
The cloud overhead passed, and left no rain, so it was finally clear to go. We put on the gardening gloves that we brought from home and started the cable ascent. It’s highly recommended to wear gloves with either nitrile or leather on the base as the metal cables can rip your hand as you pull yourself up the mountain – you can get these for $5-10 at a WalMart or Home Depot. There is usually a pile of used gloves at the base but who knows how long they’ve been there and are super gross looking – but if you need them, use them.
The cables were really fun but absolutely terrifying. As you climb vertically up Half Dome, you will use every muscle in your arms to pull yourself up the cable. If you let go, you will either fall backwards or sideways right off the mountain so we were gripping as if our life depended on it (it was). It took about 20 minutes to reach the top as you needed to let people ahead of you move up enough so you weren’t on the same cable spot, or let those coming down the mountain have space to manoeuvre as well. Whether you’re going up or down Half Dome, it’s the same cables and narrow pathway so it slows you down a bit – making it even scarier as you just stand there holding on to the cable and not able to move.
Once we got to the top, it was an unbelievable view. You can see the entire valley below you, on every side, and you have a straight view of El Capitan – one of the other famous mountains in Yosemite. The smile on our faces has never been bigger and it was worth every second of effort to get that view. We hung out there for about 15 minutes and headed down as we saw storm clouds coming our way. Luckily we left when we did as it just started to downpour right after we got down sub-dome. The 5 hours remaining of hour hike was in the rain, but we were so thankful we weren’t stuck on Half Dome or Sub-Dome at that point as it’s a very dangerous spot to be in the rain due to the highly exposed landscape surrounding you.
In total, from end to end, the hike from our campsite to the top of Half Dome and back took 12 hours, including our bathroom breaks, lunch break and my busted knees. The hike ended with a black bear wandering about 50 feet away from us which was super cool as I always wanted to see a bear up close in the wild. Again, we of course kept our distance knowing we had yummy lunch garbage sitting in our backpacks.
MERCED RIVER (YOSEMITE)

The day after we climbed Half Dome, it was time to take it easy. We made a wonderfully large breakfast of scrambled eggs with cut up salami, pita bread, and of course, a large amount of coffee with Baileys. Baileys is always our go-to when camping so we don’t need to bring milk and sugar for our coffee.
A friend of ours had done a Yosemite trip last year and recommended we bring rafts or inflatable tubes to use in the river. Totally forgetting to do so, we planned on just hanging out by the water, but we got lucky when a couple was leaving their campsite and I spotted two perfectly good water tubes that we bought off of them.
The Merced River runs right through the valley and goes around all of the campsites with small rapids along the way. You weave around all of the massive mountains that are on all sides of you as you float lazily along the river in the hot sun – it was literally paradise. After getting our fix, we pulled over to the side and got out next to a shuttle stop. Since Yosemite is so massive, there is a wonderful shuttle service that takes you all around the park – and helps to reduce the traffic and environmental impacts of numerous cars driving around the sites. You can literally get out of the water miles from where you started and easily get back to your site via a shuttle in no time.
We spent the rest of the afternoon wandering around the valley and started cooking dinner/made a campfire as the sun was setting.
CAMP 4 AND EL CAPITAN (YOSEMITE)
Our final full day in Yosemite had us walking over to see the infamous Camp 4 walk-in campground, just down the road from where we were staying. Even though neither of us are mountain climbers, we watched a couple of documentaries before we came about the history of Yosemite’s mountain climbing and how it’s evolved over time. Camp 4 was a hotbed for mountain climbers back in the day, and it’s where the culture really started – and where the founders of brands like Patagonia and North Face got their mountain climbing fix. It had the hobo lifestyle in its history, with groups of young hippies hanging out and camping for long periods of time, with little money and lots of rebellious attitude. I was pretty pumped to see it and had this idea in my head that even in 2017, it would be the same sort of people hanging out there as it was in the 1950’s and 60’s. Well, I was wrong. It’s just a normal walk-in campground, with large families and RV’s taking up a lot of space and having cook-outs. Camp 4 was really nothing special, but it does currently play host to the environmental and rescue volunteers who keep Yosemite safe year after year.
From Camp 4, we headed over to El Capitan which is one of the most popular mountain climbing spots in the world. It was pretty cool to see a group of climbers on their way up the mountain, knowing they would be spending a couple of days and nights in a vertical position, fixed in to ropes, on their way to the top. Plus, our tent back home is named after this mountain so we had to come see it in the flesh like the camping nerds we are!
Standing at the base of El Cap and looking straight up – way up – is surreal. Like Half Dome, it’s a mammoth of a mountain and super crazy to see it’s all straight granite in what looks to be a 90 degree vertical mountain. It’s breathtaking.
TUNNEL VIEW (YOSEMITE)
The day we were leaving Yosemite was truly a sad one. It’s one of the greatest places I’ve ever been and was sad to not be calling it my home anymore. But we were off to many more adventures around Northern California so very quickly, my excitement came back for the rest of the journey.
Our next home was going to be the Sunset Campground in Sequoia National Park, and our route took us through the famous Tunnel View on our way out of Yosemite. This is a definite must-do. I’ve never seen something so beautiful in my entire life and still in disbelief that it was all real and not a fake movie set. If you’re there in the morning, you’re watching the sun slowly lift over the mountains with a very clear view of El Capitan, Half Dome, Bridalveil/Three Brothers, all placed perfectly in relation to eachother. It honestly looks like a painting and I may have cried a little bit from the beauty.
GENERAL SHERMAN AND SEQOUIA
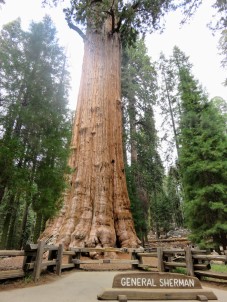
After arriving in Seqouia National Park in the afternoon we headed straight to see General Sherman and the Seqouia Giant Forest before checking in to our campsite, which was still an hour away.
The path within the Giant Forest was really cool as you are completely surrounded by some of the biggest trees in the world. You are just in complete awe as you see one bigger than the next as you walk down towards the main attraction – General Sherman, the largest tree in the world (by mass). There is of course, huge crowds surrounding the fence around the tree, but once you get a glimpse of the Sherm himself, man is he cool. Even the smallest of his limbs are absolutely massive. Seqouia tree bark is also really interesting as it’s sort of this rippled wafer-looking base, and it all smells so delicious. Sort of like maple syrup and vanilla cookies.
From here, we rushed over to check in to our campsite in the Sunset Campground, knowing we had the best site in the whole national park. I did my research before (obviously) and knew that there is only one key site in the campground based on the elevation. The site is at the very top of the hill, overlooking the forests below, and has the ULTIMATE view of the sun as it sets over the park (we were staying in Sunset Campground after all). Well, it didn’t disappoint. It was really the best sun set we’ve ever seen, and so serene looking as the pinks and purples of the sky spread itself into the trees creating a crazy and beautiful glow. Clearly the whole campground knew this was the hot spot to see the sun set, so we had the luxury of an entire campground crashing our romantic evening by casually sitting on our site. It was a bit frustrating but I couldn’t exactly blame them, as we would have done the same if we were in their shoes.
MONTEREY/BIG SUR

The next phase of our journey took us through small towns of Northern California to reach Big Sur via Monterey. Our goal here was to see the famous Big Sur ocean viewpoints along the even more famous Highway 1 but before our trip began, there was a major landslide over the highway that completely cut off access to the main part of the sites. Knowing this, we still headed down Highway 1 as far as we were able and got to see a bit of Big Sur, driving along the side of a cliff the entire way. It was pretty spectacular from what we saw but unfortunate we weren’t able to go any further.
We headed back to Monterey, which was really nothing special and planned on spending the night camped at the side of the road. If I were to do this trip again, I would cut this part out. It was a nice town but more of a retirement crowd.
SANTA CRUZ
Driving over to Santa Cruz was the next stop on our road trip, and we weren’t really sure what to expect but I’m so glad we chose to go there. It is a total beach town filled with stereotypical surfing dudes – something I had to see before leaving. Our campsite was at New Brighton State Beach and overlooked the Pacific Ocean – literally steps away and you’re in the water. We made an incredible breakfast of pancakes here right out of the car as we watched the waves on the beach. It was truly a scene in a postcard.
With food in our bellies, we drove over to Cowell’s beach and took a surfing lesson with Club Ed Surf Schools. They were fantastic and really took the time to show you how to have success on the water. We surfed right in the cove for about 3 hours, and were able to get up on our boards most of the time. We both sort of got hooked after that and couldn’t wait to get back out and surf again. The beach is right next to the famous Santa Cruz boardwalk, which is super touristy and very much like a carnival, but it was fun to walk around. We were craving fish tacos, so we headed to some local hole-in-the wall for some authentic and super fresh dinner and beers after a day of surfing. It was heaven.
This was our last night in the camper van and we were both super sad – it was so much fun living out of and travelling in the van that we weren’t really looking forward to a big city experience next. The next day, we took our time leaving Santa Cruz as we fell in love with the city and didn’t leave until the early evening. The drive was beautiful as we continued on Highway 1 and stayed next to the ocean the entire time just as the sun was setting. We stopped at Half Moon Bay on our way back to San Francisco and had dinner at a very old-school and authentic seafood restaurant called Ketch Joanne. It’s the sort of place you imagine fisherman coming in to eat at after a week at sea and everybody knows each other. It was a great place and a nice way to end our road trip.
SAN FRANCISCO – PART 2

After sadly saying goodbye to our van, we headed in to the city, staying at an AirBnB in Chinatown. It felt super weird to be surrounded by so many people and have easy access to electricity and shower facilities after camping and living in a van for over a week.
I have mixed feelings about San Francisco. Parts of it are amazing – like the food, the variety of activities and some of the sights, but other parts are not the greatest – like the grey weather due to the fog and the constant smell of urine (there are a large number of people living on the streets). It feels a bit like the city never really cleaned itself up after the 70’s so it’s a bit run-down.
We spent our few days there doing all of the touristy things – like renting bikes and going over the Golden Gate bridge to Sausalito, taking in a baseball game at AT&T park and checking out the Haight-Ashbury area where the hippie revolution took place.
BERKELEY
The next adventure for us was Berkeley for a night, which was a very lovely university town. We spent the day wandering the incredible campus and learning about the very liberal and activist history that took place on campus. If I ever went back to school, I would strongly consider going here.
PACIFICA
With our last day upon us, we changed our plans so we could try our hand at surfing again. Originally we were staying another night in downtown San Francisco but we were sort of ready to be done with the big city and spent the day in Pacifica where we went straight to the beach.
We rented surfboards and wetsuits and headed into the water. The waves were definitely not as good as the Santa Cruz ones, and the weather was grey and cold but it was fun nonetheless. We were out there a couple of hours and later in the afternoon, we had the company of about 10 whales about 50 feet away from us as we surfed. That was really an incredible experience as we watched them jump in and out of the water, and close enough we could almost touch them.
If you want to know more about our experience, or have done it yourself, I would love to hear your comments!
 - Camera Import 015")
Our home away from home
 - Camera Import 017")
Inside of the van

Entering Yosemite National Park
 - Camera Import 147")
Mirror Lake
 - Camera Import 090")
Nevada Falls
 - Camera Import 147")
Hike up Vernal Falls, Half Dome Hike
 - Camera Import 071")
Vernal Falls
 - Camera Import 078")
Half Dome Hike
 - Camera Import 101")
Half Dome Hike
 - Camera Import 202")
Half Dome Hike
 - Camera Import 049")
Half Dome Hike
 - Camera Import 161")
View from Sub-Dome
 - Camera Import 187")
Ascending the Half Dome Cables
 - Camera Import 182")
View from the top of Half Dome
 - Camera Import 168")
View from the top of Half Dome
 - Camera Import 194")
Descending the cables, Half Dome Hike
 - Camera Import 134")
Yosemite Valley – views of Half Dome
 - Camera Import 127")
Yosemite Valley
 - Camera Import 030")
Half Dome Village, Yosemite Valley
 - Camera Import 081")
Yosemite Valley – views of Cathedral Spires
 - Camera Import 006")
Lower Pines Campground, Yosemite National Park
 - Camera Import 048")
Tunnel View

The drive to Sequoia
 - Camera Import 186")
General Sherman
 - Camera Import 121")
Sequoia National Park
 - Camera Import 082")
Sequoia National Park
 - Camera Import 092")
Sequoia National Park
 - Camera Import 241")
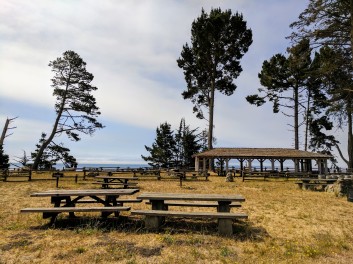
Sunset Campround

Sunset Campground, Sequoia National Park

Sunset Campground, Sequoia National Park

In-n-Out Burger, Monterey

New Brighton Beach Campground, Santa Cruz

Cowell’s Beach, Santa Cruz

Santa Cruz surfers @ Cowell’s Beach

Santa Cruz Boardwalk

Half Moon Bay

Half Moon Bay

San Francisco

San Francisco

San Francisco

Chinatown, San Francisco

Tacorea, San Francisco

San Francisco

San Francisco

Fish and Chips @ The Wharf, San Francisco

Painted Ladies, San Francisco

San Francisco

San Francisco

Haight-Ashbury area

The house of The Grateful Dead

Berkeley Campus

San Francisco

AT&T Park, San Francisco

San Francisco

Surfboards, Pacifica


 - Camera Import 034")
 - Camera Import 033")


